

react-native-radar package on npm here.
The SDK currently supports React Native 0.60.0 and higher.
Install
Install the package from npm:ios/ directory. In the Podfile, update platform :ios to 10.0 or higher. Then, run pod install. Learn about autolinking.
Before writing any JavaScript, you must integrate the Radar SDK with your iOS and Android apps as described in the iOS SDK documentation and Android SDK documentation.
iOS
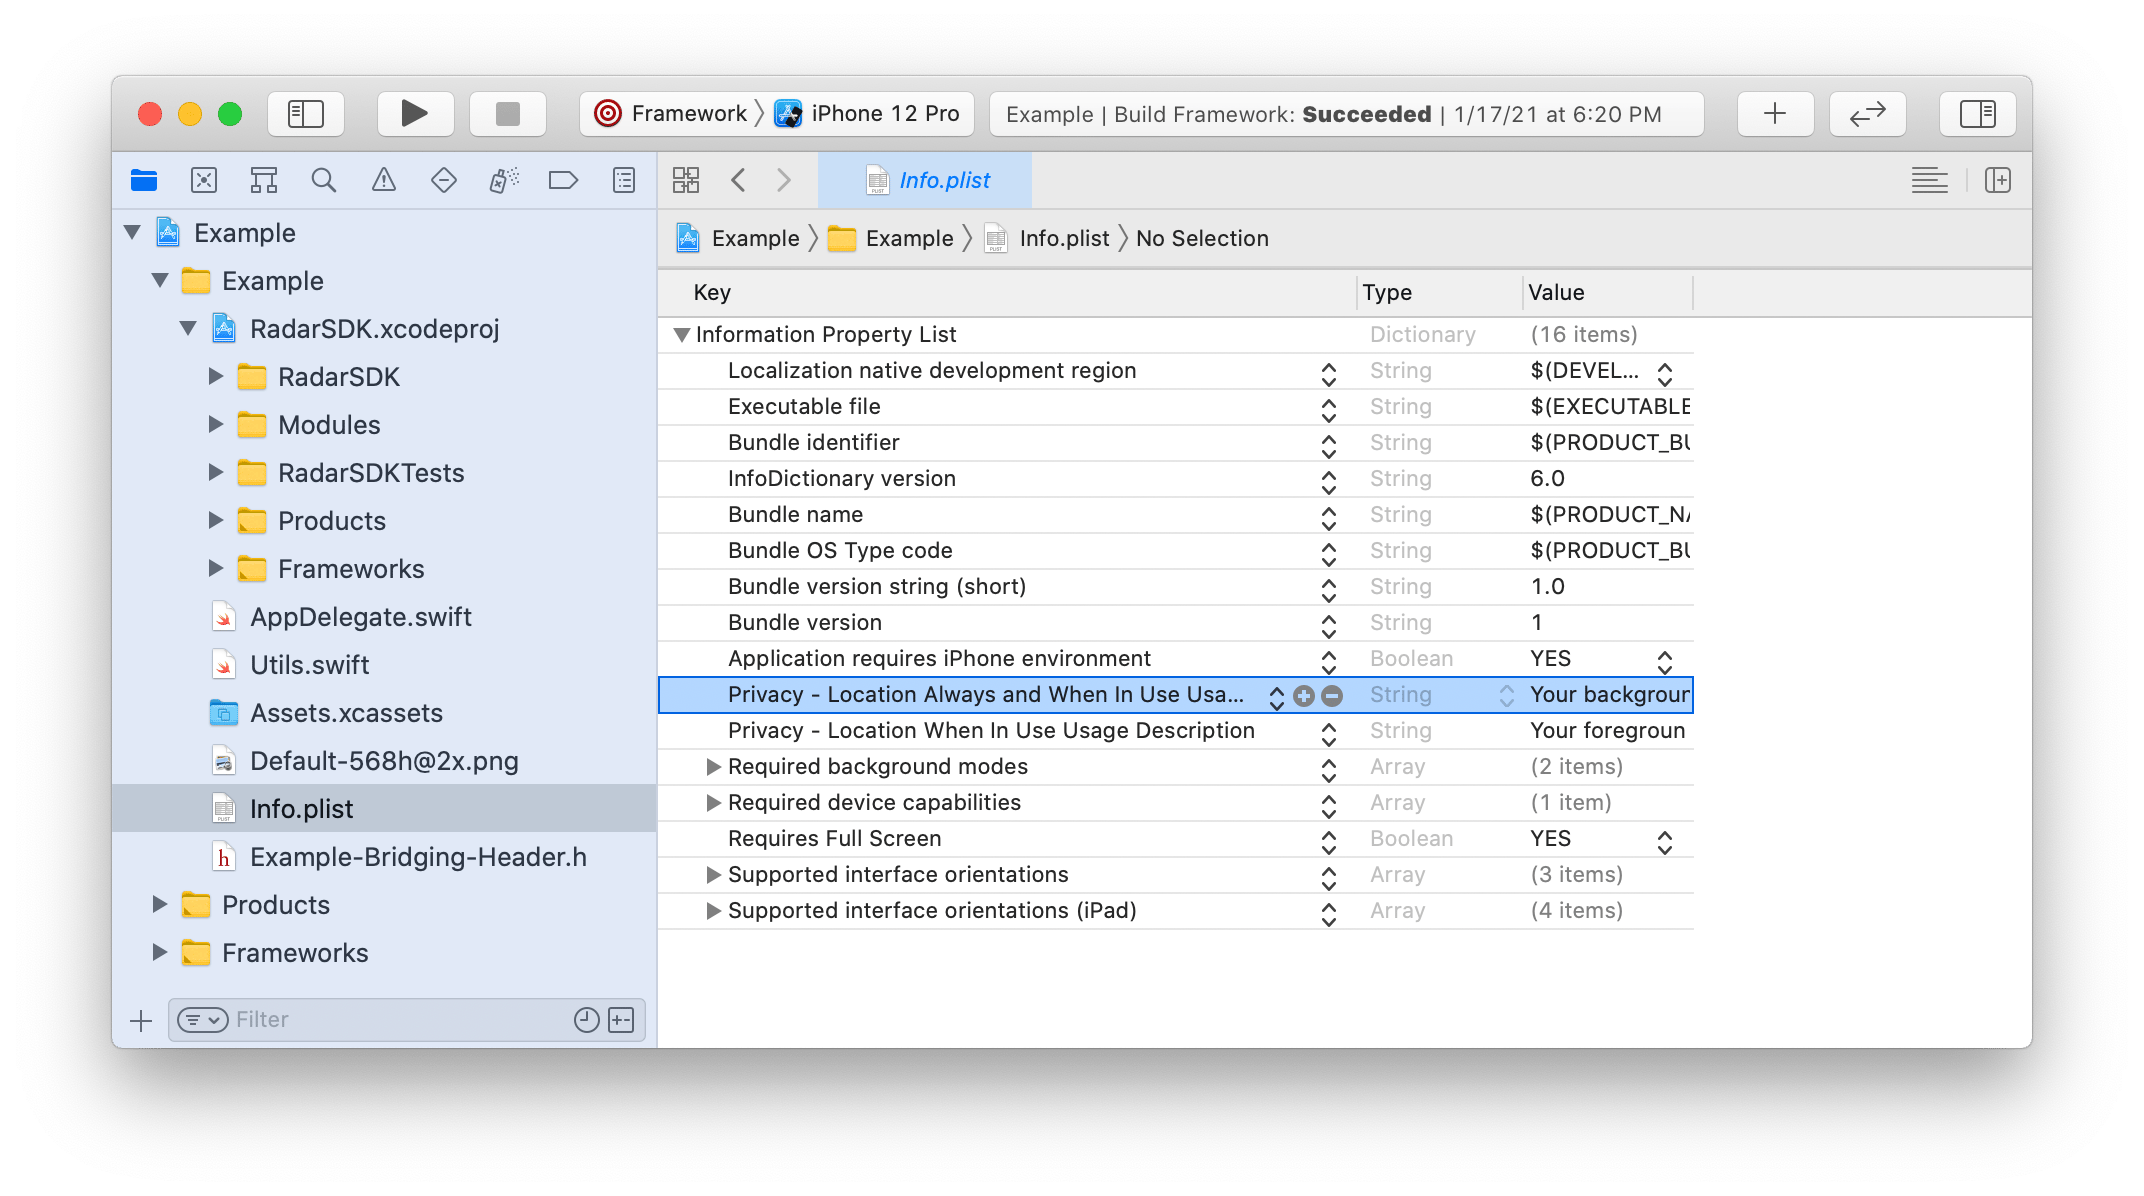
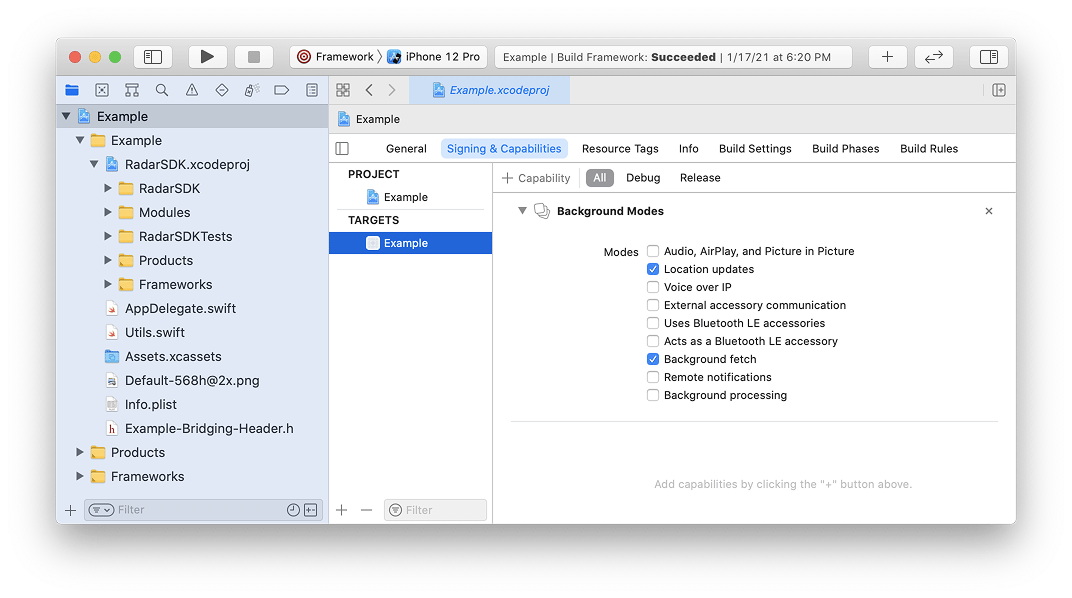
You must add location usage descriptions and background modes to yourInfo.plist. For foreground permissions, you must add a value for NSLocationWhenInUseUsageDescription (Privacy - Location When In Use Usage Description). For background permissions, you must add a value for NSLocationAlwaysAndWhenInUseUsageDescription (Privacy - Location Always and When In Use Usage Description). These strings are displayed in permissions prompts.
Android
You must add Google Play Services Location to your app’sbuild.gradle file (use version 21.0.1 or higher).
29 or higher, Radar also requires the ACCESS_BACKGROUND_LOCATION permission. You must add the ACCESS_BACKGROUND_LOCATION permission to your manifest manually:
Expo
You can also use our Expo plugin to take care of the native setup. Addreact-native-radar to plugins in app.json and specify one or more of the plugin options below:
Integrate
Import module
First, import the module:Initialize
When your app starts, initialize the SDK with your publishable key. Use yourTest Publishable key for testing and non-production environments. Use your Live Publishable key for production environments.
Identify user
To identify the user when logged in, call:userId is a stable unique ID for the user.
To set an optional dictionary of custom metadata for the user, call:
metadata is a JSON object with up to 16 keys and values of type string, boolean, or number.
Finally, to set an optional description for the user, displayed in the dashboard, call:
description is a string.
You only need to call these functions once, as these settings will be persisted across app sessions.
Learn about platform-specific implementations of these functions in the iOS SDK documentation and Android SDK documentation.
Debug logging
By default, only critical errors are logged to the console. To enable debug logging, call:Contact your customer success manager to enable logging app lifecycle events.
Request permissions
Before tracking the user’s location, the user must have granted location permissions for the app. To determine the whether user has granted location permissions for the app, call:status will be a string, one of:
GRANTED_BACKGROUNDGRANTED_FOREGROUNDNOT_DETERMINEDDENIED
background is a boolean indicating whether to request background location permissions or foreground location permissions.
On iOS and Android, the user needs to grant foreground location permissions first before you can prompt for background location permissions:
Build and run the app to make sure permissions prompts are displayed!
Foreground tracking
Once you have initialized the SDK and the user has granted permissions, you can track the user’s location. To track the user’s location in the foreground, call:err will be a string, one of:
ERROR_PUBLISHABLE_KEY: SDK not initializedERROR_PERMISSIONS: location permissions not grantedERROR_LOCATION: location services error or timeout (10 seconds)ERROR_NETWORK: network error or timeout (10 seconds)ERROR_BAD_REQUEST: bad request (missing or invalid params)ERROR_UNAUTHORIZED: unauthorized (invalid API key)ERROR_PAYMENT_REQUIRED: payment required (organization disabled or usage exceeded)ERROR_FORBIDDEN: forbidden (insufficient permissions or no beta access)ERROR_NOT_FOUND: not foundERROR_RATE_LIMIT: too many requests (rate limit exceeded)ERROR_SERVER: internal server errorERROR_UNKNOWN: unknown error
Background tracking
Once you have initialized the SDK and the user has granted permissions, you can start tracking the user’s location in the background. For background tracking, the SDK supports custom tracking options as well as three presets:EFFICIENT: A low frequency of location updates and lowest battery usage. On Android, avoids Android vitals bad behavior thresholds.RESPONSIVE: A medium frequency of location updates and low battery usage. Suitable for most consumer use cases.CONTINUOUS: A high frequency of location updates and higher battery usage. Suitable for on-demand use cases (e.g., delivery tracking) and some consumer use cases (e.g., order ahead, “mall mode”).
componentDidMount) if you want them to work when the app is in the background.
You can also remove event listeners:
Battery usage
Because React Native loads and parses your JavaScript bundle on each app launch, and because background tracking may launch the app in the background, background tracking with the React Native module can increase battery usage. On iOS, the app loads and parses the JavaScript bundle when the app is launched. If you do not want to receive events in JavaScript and you want to disable this in the background, checklaunchOptions for the UIApplicationLaunchOptionsLocationKey to conditionally parse and load the JavaScript bundle. Learn more about this key here.
On Android, a receiver in the React Native module loads and parses the JavaScript bundle when the app is launched in the background. If you do not want to receive events in JavaScript and you want to disable this, add an override to your manifest:
Trip tracking
To start a trip to a destination, call:Manual tracking
You can manually update the user’s location by calling:Location metadata
The SDK can also pass along information like motion activity detection, speed and heading via the location metadata field. Enable this feature with the Expo plugin by adding the following line into the app.json:Other APIs
The React Native module also exposes APIs for geocoding, search, and distance.Geocoding
With the forward geocoding API, geocode an address, converting address to coordinates:Search
With the autocomplete API, autocomplete partial addresses and place names, sorted by relevance:Distance
With the distance API, calculate the travel distance and duration from an origin to a destination:Matrix
With the matrix API, calculate the travel distance and duration between multiple origins and destinations for up to 25 routes:Conversions
With the conversions API, log a conversion, such as a purchase or signup, to analyze alongside your app’s location activity:User tags
With the user tag API, you can configure campaigns to only target users with the corresponding tags:Notification options
On Android, you can callsetNotificationOptions to set the icon and the background color of the foreground service and event notifications: